19Jul / 2013

Simple Rainbow Chard and the sage words of Julia Child.

I love learning about cooking and food in any form, I do not discriminate. I watch an abnormal amount of cooking shows. I read an inordinate amount of cooking blogs and am subscribed to three cooking magazines. I visit libraries to read the out of print cookbooks and memoirs of chefs and critics. I even fall asleep listening to food podcasts.

I just can’t get enough.

After picking up My Life in France by Julia Child at a thrift store last year I finally actually got around to reading it last week and I am genuinely glad I did. Julia has a vibrant voice and a fun style that kept me turning the pages. I thoroughly enjoyed the book but one sentence stuck out more than any of the rest.

“I came to understand that learning how to fix one’s mistakes, or live with them was important part of becoming a cook.”

That is the beautiful thing about cooking, most mistakes are repairable. The one’s that aren’t – aren’t and you get over it. That is what keeps me cooking.

Yesterday at the farmers market I got the most beautiful rainbow chard. Before last month I had never had rainbow chard and since it has come into season I have picked up a bunch every week. It is my new favorite vegetable and I look forward to cooking and eating it every week. I even made it for my rice and bean loving, vegetable hesitant father and he gobbled it up. This week however, I must have seen something shiny, lost focus and burned the hell out it.

Oops.

Julia Child’s words came to mind as I threw out my once gorgeous now inedible green. I thought ‘There’s always next time’ and made a salad instead.

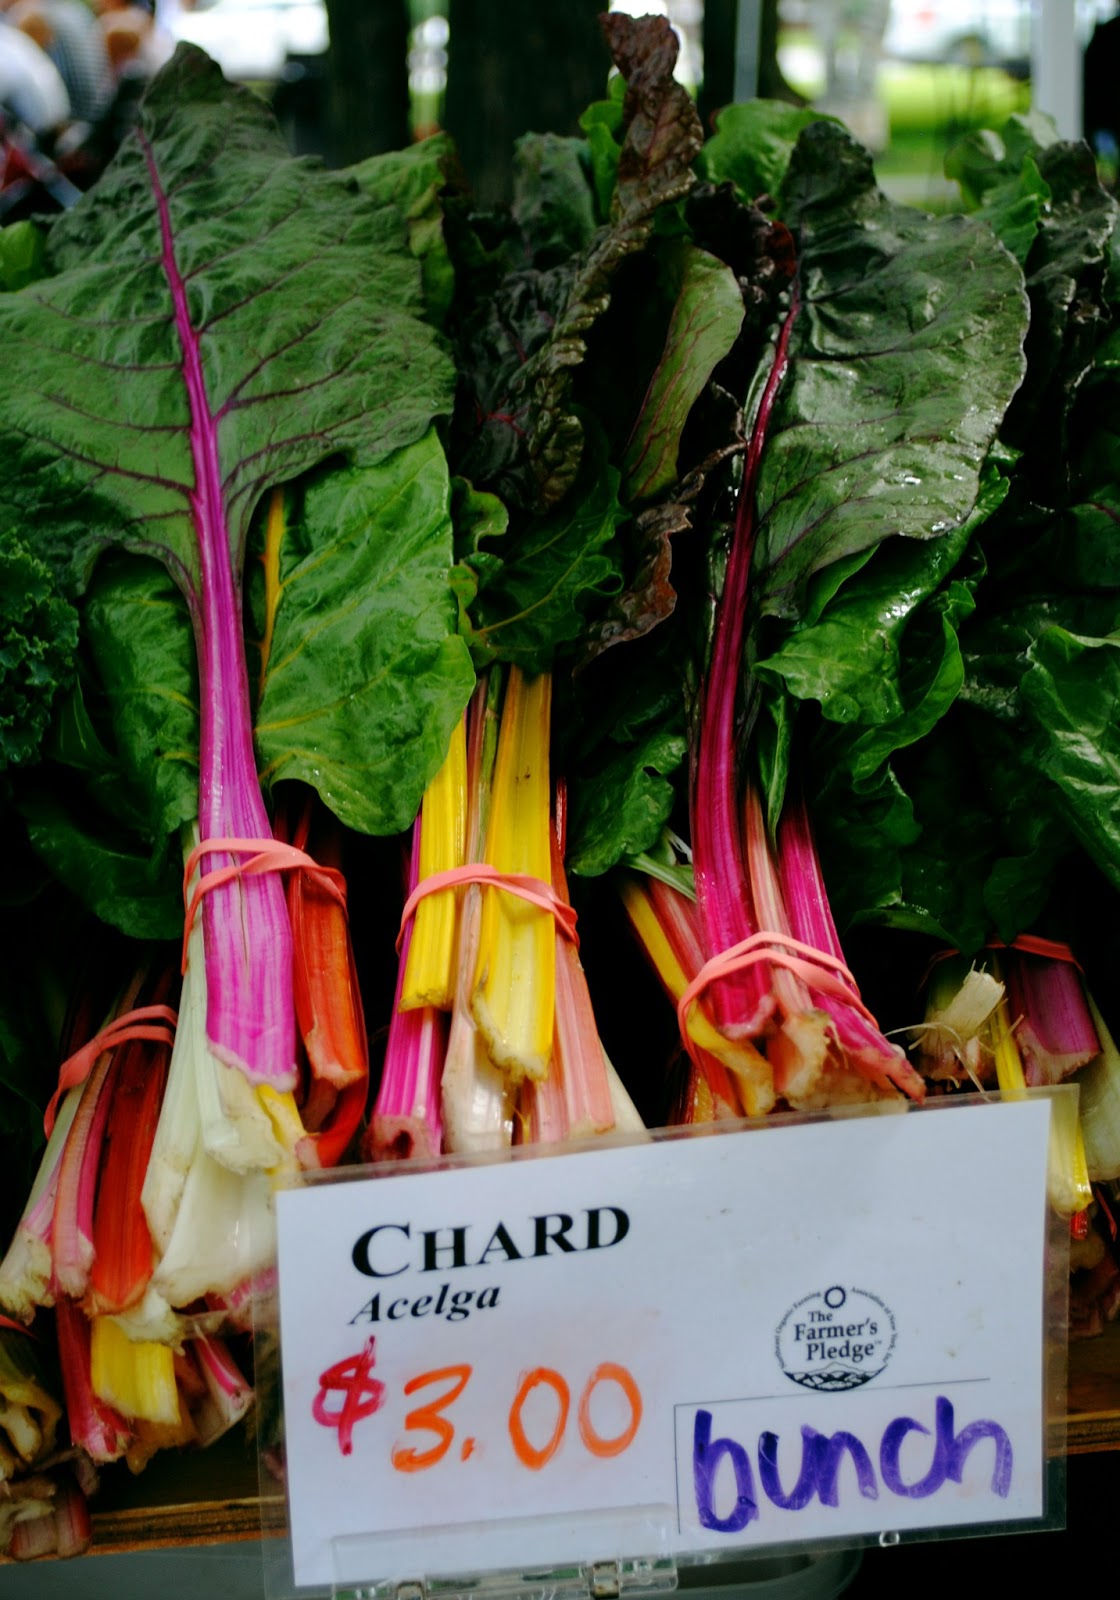
Taken at the Clinton, NY farmers market. Common Thread are my go to veggie people.

This is how I made it the first few delicious times. – Adapted from Simply Recipes.

Simple Swiss Chard:

a side that serves 2

1 bunch of Swiss chard. If you can find rainbow chard, try it! There is something more exciting about it.
1-2 cloves of garlic – minced
1 Tbsp Extra Virgin Olive Oil
1 Tbsp Butter
1/8 tsp of ground sea salt
Ground pepper to taste

1. Cut and discard the stems of the chard.
2. Cut into strips about 1 inch wide and no longer than 5 inches.
3. Wash chard in cold water and set aside.
4. In a heavy bottomed frying pan on medium heat add olive oil and garlic.
5. Let garlic cook for 2 minutes and add the chard to the pan. Toss around with tongs until the chard is coated with oil.
6. Reduce to low heat, cover with a lid and cook for 7 minutes. The water from washing the chard and the oil should be enough to cook the chard through.
7. Add butter, salt and pepper and serve immediately.

26Jun / 2013

A lack of cooking equipment.


In the June issue of Bon Appetit a recipe was featured for a roast chicken using herbs de provence. The magazine suggested making this chicken for a picnic, packing it up to serve at room temperature in a park somewhere. However romantic a notion, I’ve never really been into the idea of a picnic, nor have I been inclined to wait for a roast chicken. It being the opposite of picnic weather here in Clinton, NY (as evidenced by my drowned roses and dismal forecast below) I decided to deviate from my regular roasted chicken and give this one a try.

Only one problem, although I was the only 22 year old I knew to have my very own kitchen-aid stand mixer, I, at 27 still have failed to acquire the roasting pan with a rack that the recipe requires. My creative (read cheap) idea was to roast the chicken directly on the oven rack as I do in this recipe for roast beef. I promised my few but faithful readers that I would write of my failures as often as my successes and now I must share how I very nearly started an oven fire. See, what I hadn’t taken into account was the much higher fat content of a whole chicken compared to a roast beef and the much higher temperature that it would have to be cooked. Once again, my significant other had the privilege of coming home to a cloud of smoke. I lowered the temperature to 400° while keeping the oven door open and fanning the kitchen door open and closed for the smoke to dissipate. The chicken cooked at 400° for the remainder of the 25 minutes that it was supposed to be cooking at 475° and then for 40 minutes at 350°, a little longer than recommended, to achieve the correct internal temperature. Disaster avoided.

All I did differently from Bon Appetit, was use a garlic powder instead of fresh garlic and stuff a few sprigs of rosemary in the cavity. I suggest actually using a roasting pan and rack and if your chicken still threatens to ignite… well then consider this post as an effective escape plan that resulted in some pretty delicious chicken. Now I’ll just sit here munching on my leftovers dreaming of drier weather and researching the building of arks.

Buen Provecho!

23Mar / 2013

Eggs in purgatory (For Tom)

I used to work as a waitress in an Italian restaurant in Montclair, NJ. I would joke around with the chef, Alan Gaeta, and watch over his shoulder as he made his spectacular soups, panna cotta, semolina gnocchi and eggs in purgatory. On the menu he called it grandma’s eggs in purgatory which lends to how you feel when you’re eating such a dish. There is a hint of it being so good that it must have been made with experience, a gentle hand and only loving thoughts for the eater.
To be honest, I’ve bastardized poor grandma Gaeta’s eggs in purgatory.
Although it wouldn’t have taken a whole lot of time I did not make the sauce.
I know. I’m terrible, right?
Homemade tomato sauce is fun and altogether simple but sometimes a person just wants to eat without so much fuss. Of course this would be a wonderful thing to do with leftover homemade marinara if you have it. I am a serious advocate for all things homemade but some people take it too seriously.
If you’re a home cook and want breakfast/brunch/lunch that looks extravagant, has all the comforts of mashed potatoes with gravy and took all of 15 minutes, well, consider the help from a jar.
Pardon the picture quality. Iphones are pretty good but not SLR’s
Eggs in Purgatory
Serves 2
1/2 Jar of tomato sauce. *
1 Tbsp of extra virgin olive oil
2 crushed cloves of garlic. (when using store bought tomato sauce I always add one fresh ingredient.)
4 large eggs
1 Tbsp of grated Parmesan
Crushed red pepper, salt, and pepper to taste.
In a stainless steel or cast iron pan, heat the olive oil on medium heat.
Add the garlic and cook through.
Add the tomato sauce and wait until the sauce is at an even boil. Remember, the sauce has to be hot enough to poach the eggs.
Crack the eggs as close to the tomato sauce as you can and let boil until the bottoms of the eggs begin to turn white.
Evenly coat the eggs with the Parmesan and the crushed red pepper if you desire.
Then loosely cover the sauce and eggs with a lid.
Cook until you reach your desired yoke consistency.
Serve on top of toasted English muffins as I did or if you’re planning ahead get a really nice fresh loaf of bread to really wow.
*For the sauce I used Bertolli’s Olive oil and garlic sauce. I like it for this purpose because of how thin it is initially so it takes well to being boiled and thickens nicely.

Buen Provecho!

18Sep / 2012

Intro to Danishes

To celebrate what would have been Julia Child’s 100th birthday, PBS has made available through their website different shows hosted by Julia Child. Being the dork I am I have been watching these episodes incessantly since I realized they were there. Having access to Baking with Julia, Cooking with Master Chefs and Julia’s Kitchen with Master Chefs is an amazing resource. I encourage everyone to watch a couple episodes if they can and get ready to be inspired. It is so valuable to be able to watch incredibly influential chefs like Charles Palmer and Rick Bayless as young lads prepare meals and explain techniques slowly.

I was very inspired by a Baking with Julia episode where she watches Beatrice Ojakangas make classic danishes. I watched the episode probably 10 times without exaggeration. The other day I finally built the courage to try her recipe for myself. Definitely not as simple as the recipes that I have normally written about but the outcome was worth it. I have more dough left and I plan on making this recipe again but adding my own touches. Stay tuned.

In the meantime remember to keep on cooking!

05Sep / 2012

Grilled peach, chicken and zucchini salad

It has been one crazy summer composed of amazing weddings, graduations, birthdays and spontaneous trips to vacation lands. Unfortunately all the good summer plans and madness got in the way of me cooking. The madness, however, had no effect what-so-ever on how much I was eating. Not to worry.

This week I had a little reunion with my kitchen. As I got to turn off the air conditioner, open the windows and see the first of the leaves falling off the trees I made what I think is a perfect end of summer dish. Simple. Simple. Simple.

Grilled peach chicken and zucchini salad for two.

1 package of spring mix
1 small zucchini cut into half moons.
1 white peach cut into wedges
2 chicken breast. (The pieces I had were so big I ended up only using one for the salad and saved the other for a sandwich the next day.)
1/4 lb mozzarella cut into small thin wedges
1/2 tsp of ground ginger
1 Tbsp Extra virgin olive oil.
salt and pepper to taste

1. Rinse off the spring mix and set aside.
2. Season chicken with ginger, salt and pepper put medium high heat grill about 10-15 minutes per side depending on thickness or until juices run clear. Set aside.
3. Slice the zucchini and toss the pieces with the olive oil and salt and pepper.
4. Put the zucchini and peach slices on a medium heat grill. I put them on for about 4 minutes per side or until crisp tender.
5. Slice chicken and toss all together with the mozzarella, spring mix, peaches and zucchini.

After I decided I was going to make this meal, I realized that we were out of propane. I had to bring out the good ol’ cast iron grill pan. This made grilling half moon zucchini much easier. If using outdoor grill would suggest just slicing. If you’re anything like me you will lose half of them and the swearing will ensue.

I chose to drizzle a little balsamic vinaigrette on my salad but in the future I might use a ginger dressing. The sweetness from the peaches really softens the bitterness from the greens and adds an amazing flavor to the chicken.

Sorry again for photo quality. Had to use my camera phone but I hope you get the idea : ) 

03Jul / 2012

Steamed Clams over Sauteed Escarole


I was on the phone with a friend last night explaining how I was trying a new recipe that I wasn’t exactly thrilled with but that tasted pretty darn good. I wasn’t going to post about it until she reminded me that I should be writing about the recipes I want to improve too. People can learn from my mistakes right?

A few years ago I worked for an Italian restaurant with a rather eccentric and accomplished chef. He would work for hours quietly concentrating on the small details of everything he made. He reminded me of Eeyore and I loved watching him slowly move through his kitchen with such calculated movements. He made the best chicken soup I’ve ever had, the only one I like more than my own. He made baked semolina gnocchi drizzled with a mushroom cream sauce that I promise to try and recreate one of these days. He was a huge inspiration to me in the kitchen. It was just me for dinner last night so I picked up a head of escarole with the intention of mimicking the sauteed escarole he used to make. I also saw a dozen little neck clams on sale so I brought them home too.

Here’s what happened:

1 Dozen little neck clams
1 Head of escarole
1 Tsp kosher salt
2 Tbsp extra virgin olive oil
2 Cloves of garlic – thinly sliced
1/8 Tsp. red pepper flakes
Lemon juice and butter for dressing.
salt and pepper to taste.

I chopped off the end of the escarole and washed the leaves under cold water and let it sit in a colander while I scrubbed the clams clean and sliced the garlic.

In a large pot I set water to boil with 1 teaspoon of kosher salt. Once it was at a rolling boil I put the escarole in for two minutes to par boil. I drained the escarole and let it sit in the colander again. In the same pot I used for the escarole I placed the clams so they were standing in a inch of water and brought the water to a boil.

While the clams were cooking I heated the olive oil in a frying pan. To the hot oil I added the red pepper flakes and sliced garlic. I let the garlic cook for one minute and then added the escarole to the pan to coat with the olive oil and let it cook for two minutes.

The clams are cooked as soon as the open up and by the time the escarole was done most had opened so I made myself a plate. and drizzled lemon juice and a little melted butter over the clams.

So here is the only problem I found the greens were very tasty but a little…wet. In the future I might dry the escarole off on a paper towel or omit par boiling all together and just saute longer. The par boiling did help remove all the bitterness involved with the escarole.

This was a perfectly light but filling dinner for me but I fill easy. Put this on a bigger platter with more escarole and more clams it would make for a really nice family style appetizer.

15Jun / 2012

Blueberry Coconut Granola

Man do I love eating breakfast. I love making Saturday morning French toast or Sunday brunch poached eggs with thick cut bacon but, what about all the other days of the week. Wolfing down a bowl of cereal or grabbing a banana on the way out the door just never really satisfies the way I want it to. I have a solution for weekday rushed breakfast: Sunday night granola. Making the granola the night before takes all the pressure off weekday mornings and you can still have a special homemade breakfast.  Having homemade, crunchy- sweet granola will help a Monday feel less terrible. I found a recipe that I switched up a bit and really did the trick.  Best part is, it’s so freakin’ easy. 

4 Cups rolled oats

3/4 Cup sliced almonds
1 Cup of flaked coconut
1 Cup Maple syrup 
1/2 Cup brown sugar 
2 Tsp Vanilla extract 
2 Tbsp Lemon juice 
1 Tsp Lemon Zest. 
1 Cup of dried Blueberries.
Preheat oven to 350 degrees
1. Combine oats, almonds, and coconut in a large bowl and set aside. 
2. In a medium saucepan  put maple syrup, sugar, vanilla, lemon juice and zest on low heat. Stir until combined and sugar has melted. 
3. Pour syrup mixture over the oats and toss the oats like a salad until well coated. 
4. For easy clean-up line a baking sheet with foil and pour the mixture on the sheet. 
5. Bake for 10 minutes and stir the granola on the baking sheet and continue to cook for another 10 minutes or until granola is no longer sticky or wet. 
6. Let the granola cool on the baking sheet and then add the dried blueberries. 
Serve with milk or yogurt and some fresh sliced fruit and you’ve got a pretty quick and special weekday breakfast. 

01Jun / 2012

Parmesan Risotto with Roasted Aparagus

I took a quick posting hiatus but I definitely haven’t stopped cooking. 
There are few things better than a homemade bowl of Parmesan risotto. I tend to make this risotto about once every other month. It comforts, it soothes, and when I add a little roasted asparagus I don’t feel so bad about eating a bowl of wine, broth, and cheese soaked rice.
Here’s what happened:
1 Bunch of asparagus – I only actually use half the bunch and save the rest for other dishes.
1 Quart of chicken broth. – Homemade if you have it. I often make this dish after the chicken process has begun.
1 Small Spanish onion 
2 Cloves of garlic – minced 
1 1/2 Cups of arborio rice
3/4 Cup of white wine – I almost always use Pinot Grigio for it’s crisp clean taste. Use whatever you like to drink.
1/2 Cup of Parmesan cheese – grated
Extra Virgin Olive Oil.
Salt and pepper to taste.
For the Asparagus: 
1. Preheat oven to 350 degrees.
2. Drizzle asparagus with olive oil and salt and pepper to taste. 
3. Bake in oven on a baking sheet for 10-15 minutes depended on the thickness.
4. Take what you want for the risotto and cut into inch sized pieces.
For the Risotto:
1. Put the chicken broth in a large saucepan and set to a very low heat. 
2. In a medium heavy bottomed saucepan add two tablespoons of extra virgin olive oil. To the hot oil add the shallots and garlic.
3. Stir and wait about 3 minutes before added the rice. Stir the mixture together making sure the grains are coated with the oil keep stirring for 2 minutes. 
4. Add the wine stir to combine and let the rice soak up the wine. 
5. Once the wine is soaked up add a ladle-full of the chicken broth, a little more than 1/2 cup. Stir to combine and then allow the rice to do the work. 
6. Repeat this process, stirring often, until the rice is cooked al dente. This takes about the entirety of the quart of chicken broth to achieve. Towards the end of the broth start taking little tastes till you get the softness you prefer.
7. Once the rice is done add the cheese and chopped asparagus. I strongly recommend using freshly grated real Parmesan. It makes a real difference.

30Apr / 2012

Congratulatory Vanilla Almond Texas Sheet Cake


My friend and roommate, originally from Texas, recently got married in his home lone-star state. We were really bummed we couldn’t make it down for the wedding but we decided to throw him a little surprise party. What would be more fitting than to make him some good old fashioned Texas sheet cake. I originally had in mind (read: bought the ingredients for and started making) a chocolate sheet cake when I had the sense to ask him if he even likes chocolate cake.

“Making chocolate cake for the blog, don’t you just love chocolate cake”

“No, it’s not my thing”

New plan.

I quickly searched for a vanilla cake recipe and found a white Texas sheet cake recipe all over the place but I wanted a little less almond flavor.

Here’s what happened:

For the Cake
2 Cups of all purpose flour
2 Cups of sugar
1 Tsp of baking soda 
1/2 Cup of butter
1 Cup of water
1/2 Cup shortening
1/2 Cup of buttermilk
2 Eggs
1 Tsp of vanilla extract
1 Tsp of almond extract
1 Tsp of lemon zest.

Pre-heat oven to 375 degrees.
Grease and flour a half sheet pan/17in jelly roll pan.

1. In a large mixing bowl, sift together the flour, sugar, and baking soda.
2. Put the butter, water, shortening in a medium sauce pan on a low heat till totally melted and combined. Set aside till a little cooler.
3. In a smaller bowl beat the eggs, buttermilk, extracts and zest together.
4. Add all the wet ingredients to the dry ingredients stir until smooth.
5. Pour batter into prepared half sheet pan spread out evenly (It was very useful to have an angled spatula to make this cake) and set to bake for 20 minutes.

If you are like me, you are confused/concerned that the half sheet is way to shallow to bake a cake. It’s not. It is a very thin sweet cake that is quick and great for a crowd.

While the cake was cooling. I made the frosting

For the Frosting:

1 Cup of very soft butter
3-4 Tbsp. of heavy cream.
1 Tsp. of vanilla extract
3 Cups of confectioners sugar.

1. Sift the confectioners sugar in a bowl and set aside.
2. With an electric hand mixer using the whisk attachments whisk the butter, heavy cream and vanilla together until smooth.
3. Adding the confectioners sugar a few tablespoons at a time continue mixing until you’ve used all the sugar up.

20Apr / 2012

The Chicken Process : Roast Chicken and Broth


There are a few things I need to cook to make myself happy and roast chicken is one of them. Making roast chicken starts off what I call the chicken process. There are hundreds of roast chicken recipes everywhere and I’mm well aware of how similar they may look to this one but this is the one I’ve been making the longest. From this chicken I often make broth(recipe below) or use the rest of the bird for other things such as chicken pot pie.

1 Whole 4-5lb organic chicken
2 Tbsp good olive oil
1 Head of garlic – halved
1 Small lemon – in quarters – Sometimes I can only fit half of the lemon, don’t worry, there will still be great flavor.
6 Sprigs of Rosemary
6 Sprigs of Thyme
3 Tbsp Kosher Salt
Fresh ground pepper

Pre-heat oven to 375 degrees

1. Wash off the chicken and its cavity and thoroughly dry the outside of the bird.
2. Sprinkle the olive oil all over the top the bird and massage under the skin of the breast.
3. Sprinkle 1 Tbsp of kosher salt and grind some pepper in the cavity.
4. Put 4 sprigs of thyme, 4 sprigs of rosemary, garlic and lemon in the bird. – If you have kitchen twine tie the legs together.
5. Run your knife through the rest of the thyme and rosemary and sprinkle the herb mixture, garlic powder, remainder of the salt and pepper evenly over the bird.
6. Bake at 375 for 1 hour and 20 minutes or more if needed. Let sit for 10-15 minutes before cutting into it.

Had to take this photos with my phone as my camera was missing at the moment. Sorry for the terrible quality. 

Since I’m always cooking for two I normally just carve the breasts for dinner that night and take one leg for the next day.

For Chicken Broth:

I then take the rest of the carcass remove what I can out of the cavity and pour water in a large sauce pan till the breast bone is about covered.

To the pot add :
2 Carrots
2 Stalks of celery
1 Small onion – halved.
If you saved the neck from the inside of the bird add this too for more flavor.
Salt and pepper to taste.

1. Let this mixture simmer covered for 2-3 hours.
2. Strain the broth and store in the fridge for a week of freezer for a month. I heard a great tip of freezing the broth in ice cube trays and storing the chicken broth cubes in freezer bags for when you just want to add a little chicken flavor to a dish.