Category Archives: Uncategorized

13Apr / 2012

Quinoa Salad with Maple Balsamic Vinaigrette

I need to spend more time than I have right now to explain what happened with the Easter ham, so, I will post about a quinoa salad that I experimented with the other day. Due to being fairly poor, I spend a lot of time deciding on how to reinvent my left overs. This process often gets too creative and doesn’t work well at all. This quinoa salad however, turned out pretty well, so I’ll share. A few days prior to making this salad I made something I called a warm asparagus salad. I quickly cooked one minced clove of garlic in one tablespoon of extra virgin olive oil. To that I added 8-10 diced spears of asparagus, half a diced red onion and half a yellow pepper diced. I served that mixture over spring greens. As I was only cooking for two I ended up with 1 1/2 cups of veggies left over. 
I visited a good friend of mine last summer and she served a quinioa salad that involved a maple balsamic vinaigrette. It was light, refreshing and filling. Food memories stick with me a long time and here is my take on what she made that day although I can not remember what she put in it. I’ll blame that on the vodka she was serving with the quinioa. 
Here’s what happened: 
For the Quinioa:
1 Cup of Quinioa
2 Cups of Water
1/2 Tbsp of Butter
1/2 Tsp salt 
For the Vinaigrette: 
1/4 Tsp Ground Pepper 
1/2 Tsp Kosher Salt 
3 Tbsp Maple Syrup – Grade B 
2 Tbsp Balsamic vinegar 
1 Tbsp Olive oil 
1/2 Cup of Diced carrots – I had maroon carrots on hand which added a great color.
1/2 Cup of Fresh mozerella – diced – I added this to make a little less healthy for the picky eaters to enjoy.
The vegetable mixture described above.
Salt and pepper to taste. 
1. Bring water and quinoa, water, salt and butter to a boil in a medium saucepan. Stir and then lower the heat to low. Cover the pan until all the water is absorbed. 
2. Add 5 tbsp of the vinaigrette to the quinoa and put it in the refrigerator. 
3. As soon as the quinoa had cooled I added the cheese, the mixture of left over veggies, and the uncooked diced carrots and one more tbsp. of the vinaigrette.
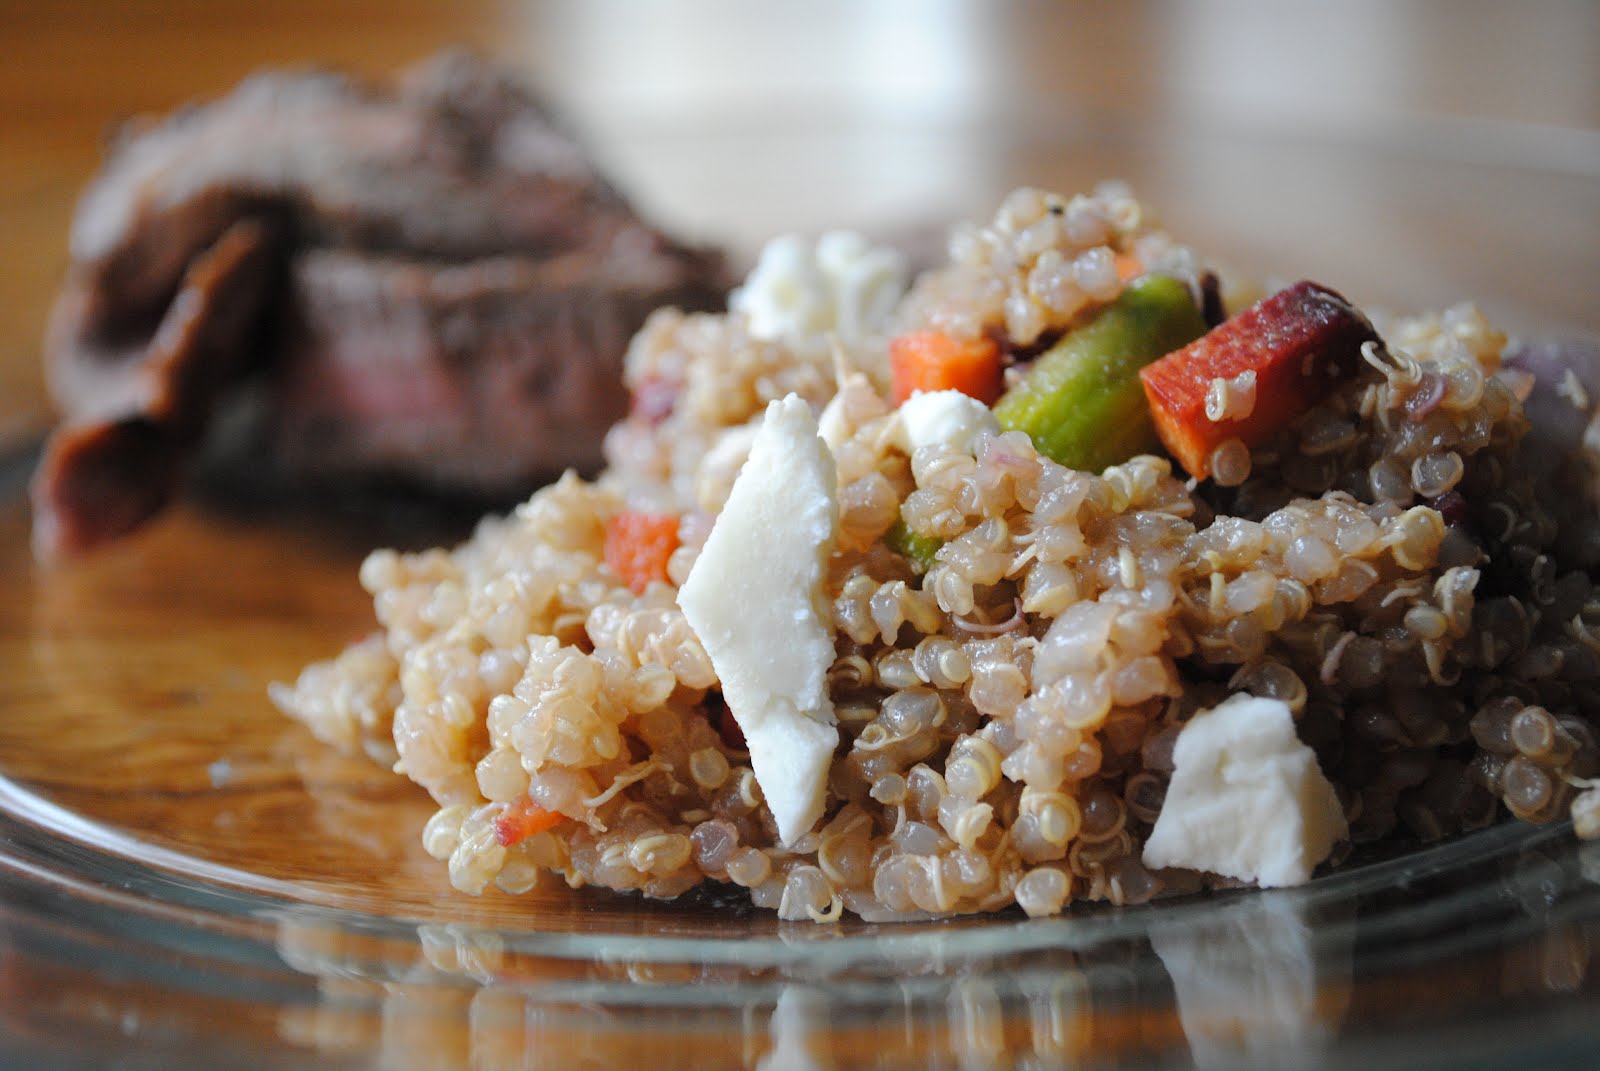
The quinoa salad held up really nicely alongside a London broil I made that night.

07Apr / 2012

Easter Fresh Ham?

My mother, for the first time ever, decided to buy a fresh ham for Easter dinner. Trying to figure out what to do with it should be fun. All I know right now is I think I might need a bucket for this one. There will be documentation. Stay tuned.

05Apr / 2012

Buttermilk Almond Scones with Maple Glaze

Whatever someone originally buys buttermilk for, they are inevitably left with at least a pint extra. I purchased buttermilk to make Sunday breakfast last weekend and started brainstorming of what to do with what was left over. I was just going to make some buttermilk cornbread but I had promised a recipe involving maple syrup. This recipe is the sweet installation of my maple recipe posts. The next entry will be savory. 
Buttermilk Almond Scones:
1 Cup of Flour
1/2 sliced almonds – ground 
3 Tbsp of Sugar
1 Tsp of Baking powder
1 Tsp of Baking soda
6 Tbsp Butter – Salted – cut into small cubes
1/2 Cup of Buttermilk 
Maple Glaze:
3/4 Cup of Confectioners sugar
2 Tbsp Heavy cream 
2 Tbsp Maple Syrup 
1. Preheat oven to 400 degrees 
2. Take sliced almonds and grind them in food processors. 
3. In large bowl sift together flour, baking powder, baking soda, sugar and salt. 
4. Add sifted dry ingredients and cubes of butter into the food processor with ground almonds. Turn on until a coarse meal is formed. 
5. Return the mixture to the large bowl and add buttermilk. Stir until well combined. 
6. Turn dough over to a floured surface and form a circle about 1/2 inch thick and divide into 8 equal parts. 
7. Bake a couple inches apart on a pan lined with parchment paper for 12-15 minutes or just until they have slightly browned. 
8. While the scones are cooling whisk together all the ingredients for the glaze. 
Scones taste really great while they are still slightly warm.

03Apr / 2012

Haddock with Warm Tomato Salsa


I love cooking for myself almost as much as I love cooking for others. When I was told I was to fend for myself the other night I got excited. Cooking for fussy eaters (read : my boyfriend) can annoy me to no end. This one certain fussy eater is not fond of seafood so every time it’s just me eating I go find myself a nice piece of fish to do something with. Cooking for one is fun but it can also be challenging.When I cook for one or two I almost always end up with enough to feed at least four. I think this problem is genetic because my mother, who was only ever cooking for four, always ended up with enough for eight.

The following is a light very fast dinner for two.(I made too much as always) Paired with a light wine like Pinot Grigio and you have a simple weekday dinner or a lazy Saturday night in.

1 Large Fillet of Haddock – cut in two equal parts
1 Tbsp of Butter
1 Tbsp of Extra virgin olive oil **
A few dashes of paprika per side of fish
Salt and pepper to taste
2 Tsp of Lemon juice
1 Clove of Galric – minced
1 Ripe Vine Tomato – diced

1. In a heavy bottomed frying pan on medium heat add the oil and butter.
2. Add the haddock seasoned with salt pepper and paprika. You want to make sure you hear the sizzle as soon as the fish hits the pan. If you don’t hear the sizzle your pan is not hot enough. Cook fish for about 3 minutes per side. Squirt 1 tsp of lemon juice while cooking.
3. Remove fish from pan and add garlic and after about 1 minute add tomatoes. Add the second squirt of lemon juice, salt and fresh ground pepper. After 1 minute in the pan pour on top of fish.

** I often use half butter half oil. That way I get the butter flavor I want and the oil helps to avoid burning or browning the butter.

As soon as I took the fish from the pan I put it on a a bed of baby spinach. The butter, lemon, olive oil and tomatoes from the pan acted as a nice dressing.

01Apr / 2012

Marathon Maple Syrup Festival

The good news is, that I got a job! The bad news is, that I haven’t had as much time to cook and document my kitchen experiences. As soon as I get my act together and back into the swing of working everyday, I will get back on the blogging track.

I haven’t had as much time to cook but last last weekend, on the way to visit my parents in New Jersey, I stopped at the Marathon Maple Syrup Festival. I absolutely love small town festivals and this one was no different. As soon as I got out of my car the air was filled with the sweet smell of syrup. It being a chillier day than I had anticipated I was drawn immediately to the sign advertising maple coffee and purchased a cup.

Coffee in hand, I looked around the festival grounds I stopped into the sugar shack. The sap straight from the maple tree does not taste very good at all. It must be boiled and treated and the sugar shack in Marathon is one of the places where this is done. The man supervising the operation told me that it had been a pretty terrible year for maple syrup. Due to the unseasonably warm weather earlier in the week they had been forced to stop tapping the maple trees sooner than usual. This year central New York had only produced about a third of the maple syrup that is normally made in a winter.

Leaving the sugar shack I was allowed to take a sample of the previously treated syrup. It was much lighter and way more flavorful than any pancake syrup on the market. (I will never go back to using Aunt Jemima.) There was more than just maple syrup and maple coffee at this festival. They had maple milkshakes, maple pulled pork and chicken, maple cotton candy, maple ice cream sundaes and of course pancake breakfasts going on until 4PM.

I loved learning more about where an ingredient comes from and how it is produced. All in all I had a great time trying all the food and being inspired to try my own maple syrup recipes. I’ll make at least on thing using maple syrup for my next entry.

Maple candies being made from maple cream, which is made by heating maple syrup and stirring until a cream is formed. I brought home some of these tasty candies for mom and dad.

22Mar / 2012

Spice Rubbed Steak Tacos with Chipotle Cream Sauce


It was another beautifully warm day in Syracuse and I decided I wanted brave the grill. I did an inspiration stroll around the super market. This is where I walk down every aisle of the store with absolutely no clue what to make. I wanted something fresh and light where I could still cook outdoors.

A friend had mentioned steak tacos to me earlier so I picked up 1 1/4 lb of sirloin tip steak, a can of chipotle peppers and a package of soft tacos.

Here’s what happened:

Rub for Steak:
2 Tbsp. Kosher salt
1 Tbsp. Coarse black pepper
1 Tsp. Onion powder
1 Tsp. Garlic powder
1-2 Dashes Cayenne pepper

Chipotle Cream Sauce:
1 7oz Can of chipotle peppers in adobo sauce
2 Cloves of garlic
1 8oz Package of sour cream
1/2 Cup of mayo
1 Tsp. Black pepper
2 Tsp. Kosher salt
1 Tbsp. Honey

Toppings:
1/2 of 1 Red onion diced.
1 Green pepper diced
1 Small tomato diced
1 cup Monterey Jack grated

1. Rub the steak with the seasoning and let sit for 30 minutes.
2. In a food processor pulse the chipotle peppers and garlic until smooth and then add the remainder of the ingredients for the sauce.
3. Heat the grill to medium/ medium high heat. – I grilled the 1/2 inch thick piece of meat I had for 7 minutes per side and got a medium piece of steak.
4. Let the steak rest and prepare/slice/dice/grate the other taco ingredients. – I put each of the ingredients in little bowls and let the taco eaters help themselves.
4. Slice the steak thin against the grain.

This was enough for 9 tacos.
 

20Mar / 2012

Lemon Bars


All of my roommates have been away doing various things in different parts of the country for a couple of weeks. I wanted to make a little something to welcome them all back. ‘Who doesn’t love coming home to baked goods,’ I thought. I quickly realized, the very health conscious, medical professionals to be probably don’t really care about having baked goods around the house.

But hey, more for me!

At the market the other day I picked up some very attractive lemons and thought I could make some lemon bars. I tried using Ina Garten’s recipe but yet again I didn’t have all the ingredients.

Here’s what happened:

Crust:
2 sticks of salted butter.
1/2 cup of sugar
2 cups of flour
1 Tsp of lemon zest. *
1 squeeze of a lemon

Filling:
6 large eggs
3 cups sugar
1/2 cup of fresh lemon juice.**
1/2 cup store bought lemon juice.
2 tsp of lemon zest
1 cup flour

Confectioner’s sugar to dust on top.

1. Cream the butter and sugar in an electric mixer with the paddle attachment.
2. Sift the flour and add slowly to the butter until combined.
3. Take the dough and press it into a buttered and floured 9x13x2″ baking sheet. Make sure to pressed it in as evenly as possible.
4. Set oven to 350 degrees (I stuck the pan with the crust into the freezer for just as long as it took my oven to pre-heat,10 minutes)

5. Bake for 15-20 minutes and then let cool.
6. While the crust is cooling put the whisk attachment on electric mixer and combine eggs, sugar, lemon zest, lemon juice, and flour.
7. Pour mixture on top of cooled crust and bake for 30-35 minutes.
8. Let cool before cutting and dusting with sugar.

* Why should the filling have all the lemon fun?
** 2 Large lemons gave left me with 1/2 a cup of freshly squeezed lemon juice. Thankfully I had some store bought lemon juice on hand which worked really well. These same lemons only left me with about 3 teaspoons of lemon zest. I still came out with a delightfully intense lemon flavor.

These were fairly simple and came out great with huge lemon flavor.

I would suggest for next time:

-Adding some ground ginger or fresh grated ginger to the crust for a more complex flavor. (this is what I will try next)
-Adding a thin layer of raspberry jam before adding the filling for lemon raspberry bars.(9I made my mouth water just thinking about that.)

16Mar / 2012

Honey Bourbon Ginger Pork Tenderloin

Pin It

I was watching my new favorite show, Worst Cooks, and the contestants were trying to recreate one of Bobby Flay’s dishes. He had made a really scrumptious looking pork tenderloin that involved a bourbon sauce. I stopped paying attention to the show as soon as I heard the word ‘bourbon’. I walked into the room where the liquor is kept and picked up the bottle of Makers Mark.

I looked at the bottle with sheer determination and thought, ‘I will make something with you today.’

I had chosen my ingredient and I went straight into the kitchen. I started fussing over the stove trying to make a bourbon reduction of some sort. I thought if I could figure out how to make a sweet bourbon sauce to pour over poached pears, it would be absolutely delicious. This idea quickly turned into an indestructible tar that is still in a pan soaking two days later. I stared at the black mess for a while and picked up the bottle of makers mark again and poured out 2 tablespoons into a bowl.

Here’s what happened:

13Mar / 2012

Shrimp with zucchini and spinach over linguine

Pin It
With warm weather sweeping the northeast it’s hard to remember it’s only March. Not too long ago, I was regressing to October, this weekend, I set the clocks an hour forward and my dinner a few months forward.

Here’s what happened:

1 Lb extra large uncooked shrimp (remember to devein, no one likes shrimp poo)
3 Tbsp Butter
2 Cloves of garlic minced
1 Tsp. fresh minced parsley
1 Tbsp. lemon juice
1 Zucchini sliced in 1/2 inch circles
1 Cup spinach
1/2 Lb linguine
Extra virgin olive oil
Red pepper flakes in a pepper mill
Salt and pepper to taste

1. Set oven to 350. Set water to boil for pasta to cook while you’re making the shrimp.
2. Drizzle zucchini with olive oil. Season with ground red pepper flakes, salt and pepper to taste
3. Place zucchini on a baking sheet and set to cook for 10-15 minutes. Should be done as the shrimp and pasta are done cooking.
4. In a heavy 10 inch frying pan put 2 tbsp of butter and 1 tbsp of extra virgin olive oil on medium heat.
5. Place peeled(I take the tails off), deveined shrimp around pan until pink starts to creep around the edges of the shrimp about 2 minutes and turn over(use tongs) to finish cooking, another 2 minutes.
6. Remove shrimp from pan and add to the pan 1tbsp of butter and minced garlic. Cook garlic for 2 minutes and return the shrimp to the pan. Add minced parsley and lemon juice.
7. Add pasta, zucchini and spinach to the shrimp and toss together.

Timing and organization are important with this meal but if executed well, it should not take more than 30 minutes to put dinner together. Fresh, light, quick and most importantly, delicious.
Pin It